WordPress is a robust platform – its vast array of plugins and themes enable users to build beautiful and functional websites. However, WordPress’ best feature is arguably its potential for integration with virtually any other online service available. To underscore this point, in this article we’ll teach you how to integrate WordPress with Instagram.
Instagram is an attractive platform for sharing photos and building an engaged following. You can take advantage of its vast potential by combining it with WordPress and promoting your own Instagram account in the process. That’s a win-win in our book!
Without any further ado, get ready to learn four simple ways to integrate WordPress with Instagram using a combination of plugins and third-party services:
1. Display your Instagram feed within your WordPress posts
Sometimes you’ll want to go a step further and show a little more than just a simple “Follow” button + your follower count, and that’s where the Instagram Feed WD plugin comes in.
After activating the plugin, you’ll find a new tab named Instagram Feed WD in your dashboard. Click on it and select Settings. Before using the plugin, you’ll need to sign in with Instagram for it to detect your Access Token, so click on the corresponding button, and then on Save Changes when you’re ready.
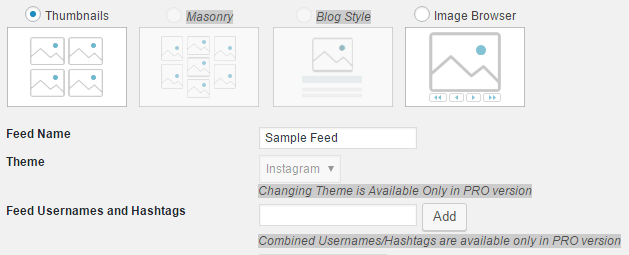
Select the Feeds tab and click on Add New. You can choose between two styles for your feed: Thumbnails and Image Browser. Pick whichever one suits your style, name your feed, and type the username(s) of the feeds you want to display:
Configure the rest of the settings to your preferences, save your changes, and then go into the editor for whichever page or post you want to include the feed in. Once the editor loads, you’ll notice a new option right next to Add Media:
Click on it, select your brand new feed, click on Insert, and then check out your new feed using the Preview option. We chose the Image Browser style for this example:
2. Display your Instagram feed within WordPress widgets
For efficiency’s sake, we’ll be re-using the Instagram Feed WD plugin for this method. After all, why bother installing yet another tool when a single one can do the job just as well?
Assuming you’ve already installed and activated the plugin, navigate to Appearance / Widgets on your WordPress dashboard, find the Instagram WD Widget, and drag it to your preferred location. Next, choose a feed from the corresponding drop-down list – we’ll be reusing the same one from our previous example:
Click on Save and let’s see how our new widget looks on a sidebar.
3. Use hashtags to automatically display specific Instagram photos within WordPress
To achieve this, we need three things: an If This Then That (IFTTT) account, a WordPress install, and an Instagram account. You should already have those last two, so go ahead and take care of the other step before proceeding.
IFTTT enables you to connect several apps through chains of actions called recipes – if you perform a particular action in Instagram that would trigger a corresponding action on WordPress, for example.
After signing up and then signing into your new IFTTT account, add both Instagram and WordPress as channels, find a recipe to automate the process of using hashtags to display specific photos within the latter, then set it up. A little time-consuming, but simple!
4. Implement Zapier Instagram integrations

Zapier enables us to integrate WordPress with Instagram in a similar way to IFFFT – in fact, we can configure it to perform the exact same function we covered during the previous step. Your first move should be signing up to Zapier and then linking your Instagram and WordPress accounts. This can be done by clicking on the drop-down menu at the top-right side of the screen while logged in, and selecting the Connected Accounts option:

Link both accounts and then return to the Zapier homepage to explore existing ‘zaps’ (these will only appear if you’re logged in). Choose “Instagram” from the main menu:

Next, scroll down to the “Popular Zaps for Instagram” section. We’re looking for the “Add new tagged media on Instagram to WordPress” integration:

Click on Use this zap and then go through the configuration wizard to set up which hashtag should be used, and on which page images should appear.
How to integrate WordPress with Instagram: Conclusion
As you can see, learning how to integrate WordPress with Instagram will enable you to handle your social media presence in a more effective manner. Gone are the days when you needed to upload each picture from your Instagram feed to your WordPress installation and insert them into your pages. If you value efficiency, implementing any one of these methods should be a no-brainer.
Let’s quickly recap the four ways you can now integrate WordPress with Instagram:
- Insert your Instagram feed on a post.
- Exhibit your Instagram feed as a widget.
- Show pictures within WordPress by using a single hashtag on Instagram.
- Implement Zapier Instagram integrations for WordPress.
What’s your favorite method to integrate WordPress with Instagram? Share your experience with this combination in the comments section below!


Or start the conversation in our Facebook group for WordPress professionals. Find answers, share tips, and get help from other WordPress experts. Join now (it’s free)!