Every local website needs an adequate environment to work properly. That typically means setting up a web server, a database, and support for all the languages you’ll need. The problem is that installing all these components can get tricky, and they may not play nice with each other. That’s why it’s worth giving local WordPress development using Docker a shot.
Docker is an application that enables you to set up entire self-contained environments with a few simple commands. It is compatible with WordPress, and can be highly useful if you need to set up various local environments with different types of web servers or tools. Because each of your containers is essentially a virtual computer, you’re free to set up different technology stacks as needed.
In this article, we’re going to explain why you should consider trying local WordPress development using Docker. Then we’ll teach you how to get started in three simple steps!
Why you should consider using Docker to create a local WordPress environment

Docker enables you to set up self-contained local development environments with ease.
In most cases, setting up a local WordPress development website requires that you install an entire environment in one fell swoop. Once you do that, you’re stuck with the environment you’ve chosen unless you want to uninstall the components and add new ones. For example, if you set up an Apache server on your computer, installing NGINX alongside it can be a real pain. However, swapping components may be necessary to recreate your production environments.
This brings us to Docker, a tool that enables you to set up isolated ‘containers’ that include entire development environments. Think of it as setting up a Virtual Machine (VM) without an operating system. These containers provide almost all the same benefits as VM, without weighing your system down. In practice, that means you can set up multiple environments on a normal computer.
As if that weren’t enough, you can also turn containers on or off at will. That way, the impact to your system will be minimal. Starting them back up when you need them just takes a single command.
Key Features:
- Create containers with isolated development environments.
- Use fewer resources than with VMs.
- Share your containers to make collaborations easier.
Price:
Docker itself is an open-source application. The company behind it also offers enterprise-level services, starting at $750 per year.
How to get started with local WordPress development using Docker (in three simple steps)
To take advantage of local WordPress development using Docker, you’ll ideally want to be comfortable using the command line. However, don’t worry – even if you’ve hardly used it, all you need to do is follow our instructions. Without a working knowledge of the command line, you might not be able to improvise. But you’ll be able to get started just fine.
For this tutorial, we’ll be using the Windows version of Docker, but it’s also available for Linux and Mac. The commands themselves are interchangeable between platforms, so the process remains largely the same regardless of your operating system. Let’s get to work!
Step #1: Download and run Docker
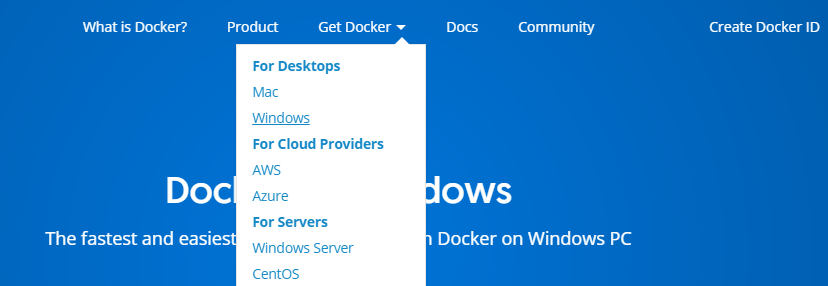
First, visit the Docker homepage and look for the Get Docker tab. Then, choose the version you want based on your operating system:
On the next page, you can download the application and then run the installer. This part is very simple – all you need to do is keep moving through the screens and wait until the installation is complete. When it’s done, you’ll need to restart your computer.
Once your system is back up and running, open your command line. On Windows, you can just search for Powershell if you don’t want to install another program. Then, type in docker ps. If you installed Docker successfully, you should see something like this:
That’s a list of the containers currently running on your computer and as you can see, it’s empty. Let’s fix that right away.
Step #2: Set up a container with a WordPress environment
There are two ways to go about this step – you can create a container and set up all the elements you need one by one, or you can do it all in one fell swoop. Naturally, the second route is the smart way to go, so let’s walk through it.
We’re going to use a tool called Docker Compose, which enables you to configure the services you want your container to have and set them up all at once. Start out by opening the command line again and entering these two commands, one after the other:
mkdir wordpress-local && cd wordpress-local
touch docker-compose.yml
What these commands do is create a directory called wordpress-local on your computer, then add a new file called docker-compose.yml inside that directory.
In order to create your WordPress environment, you’ll need to add some parameters to that file. Using your normal folder tool, find the folder you just created on your computer and open docker-compose.yml using your favorite text editor. Paste the following code snippet into the file:
web:
 image: wordpress
 links:
  - mysql
 environment:
  - WORDPRESS_DB_PASSWORD=password
 ports:
  - "127.0.0.3:8080:80"
mysql:
 image: mysql:5.7
 environment:
  - MYSQL_ROOT_PASSWORD=password
  - MYSQL_DATABASE=my-wpdb
Save your changes now, and close your editor. What you just did is instruct Docker to set up a new database for WordPress (called my-wpdb) and install the platform itself along with all the other services it needs. We also assigned specific ports and individual passwords, which you can customize by editing the values in the file. With that out of the way, let’s move on to the last step.
Step #3: Get your WordPress container up and running
All that’s left now is to tell Docker to start up your container. To do that, use the following command from within the folder where your docker-compose.yml is located.
docker-compose up -dNow, sit back and wait for Docker to download and set up all the services you indicated in your docker-compose.yml file. This might take a few minutes, depending on your internet connection.
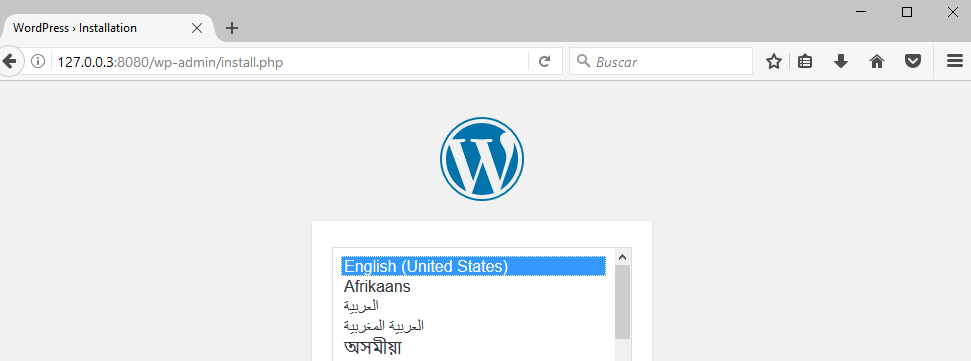
Once the setup is complete, you’ll be able to access your WordPress site from any browser by entering the ports you set up earlier. In this case, those would be 127.0.0.3:8080:
All that’s left to do now is follow the regular WordPress setup process in your browser.
Keep in mind that you can set up as many Docker containers as you want, and power them up or down at will using these two commands:
docker-compose stop
docker-compose up -d
Now you’re ready to get rocking with your local WordPress development using Docker!
Conclusion
There are plenty of ways to set up local environments for WordPress development and create simple testing sites, but Docker stands out thanks to its compartmentalization features. With it, you’ll be able to set up multiple environments side by side using different components and turn them on and off at will, which is a huge plus.
Here are the three steps to setting up local WordPress development using Docker:
- Download and run Docker.
- Set up a container with a WordPress environment.
- Get your container up and running.
Do you have any questions about how to get started with local WordPress development using Docker? Feel free to ask us in the comments section below!


Or start the conversation in our Facebook group for WordPress professionals. Find answers, share tips, and get help from other WordPress experts. Join now (it’s free)!